> For the complete documentation index, see [llms.txt](https://help.onform.com/llms.txt). Markdown versions of documentation pages are available by appending `.md` to page URLs; this page is available as [Markdown](https://help.onform.com/coaching/analyze/finding-and-using-the-drawing-toolbox.md).
# Draw on a video
Draw lines, arrows, circles, angles, distances, timers and text on a video in Onform, choose your five favorite tools, and change colors and thickness.
Works on: iPhone, iPad, Android and web. iPhone and iPad have all 11 drawing tools. The web app has four, and the Android app has a smaller set too.
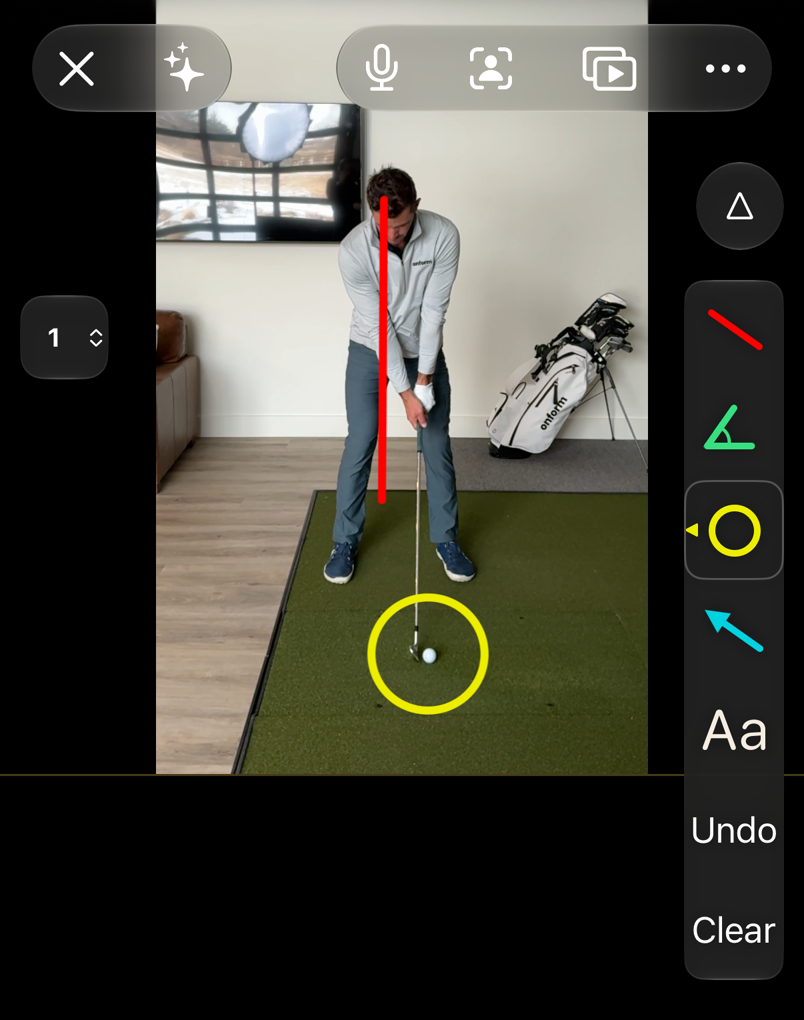
Pause on the moment that matters, such as impact, foot strike, release or take-off, and mark it up: a line along the spine, a circle round the front foot, an angle at the knee. Drawings are the quickest way to show an athlete exactly what you mean.
## Open the drawing tools
{% tabs %}
{% tab title="iPhone and iPad" %}
1. Open a video.
2. Tap the pencil tip at the top right of the screen, under **⋯**. (If you've turned on **Left Handed Controls** in Onform's settings, it's at the top left.)
3. The drawing toolbar opens below it: five tools, then **Undo** and **Clear**.
4. Tap a tool and draw on the video with your finger.
Tap the pencil again to close the toolbar.
On iPhone
{% endtab %}
{% tab title="Android and web" %}
**On the web:**
1. Open a video.
2. Tap the pencil at the top of the screen.
3. Pick a tool from the bar at the top: free draw, line, box or circle. **Undo** and **Clear** are next to them.
4. Draw on the video with your mouse or trackpad.
5. To choose a tool's color, tap the tool again and pick red, green, yellow, blue or white.
To stop drawing, tap the pencil with a line through it, at the end of the bar.
**On Android:** open a video and tap the pencil. The Android app has fewer tools than iPhone and iPad, and the steps may differ from the ones on this page. We're still confirming exactly which tools it has.
{% endtab %}
{% endtabs %}
## The tools (iPhone and iPad)
| Tool | What it does |
| -------------------- | ---------------------------------------------------------------------------------------------------------------------------------------------------------------------------------------------------------------- |
| Line | A straight line, for a spine angle, a bat or club shaft, or a shin. When the line is almost level or almost upright, Onform shows its angle, so you can check whether a shoulder line or a pole is really level. |
| Arrow | A straight line with an arrowhead, to show a direction of movement. |
| Free draw | Draw freehand, like a pen. |
| Free draw with arrow | A freehand line that ends in an arrowhead, for a curved path such as a hand path or a run-up. |
| Circle | Circles a body part, a ball or a piece of equipment. |
| Box | Draws a rectangle around an area. |
| Line with angle | A straight line that always shows its angle from level, such as the tilt of the shoulders or a forward lean. See [Measure an angle](/coaching/analyze/using-the-angle-tool.md). |
| Angle | Two connected lines that show the angle between them, such as a knee or elbow bend. See [Measure an angle](/coaching/analyze/using-the-angle-tool.md). |
| Distance | A line that shows a real-world length, such as a stride or a stance width. See "Measure a distance" below. |
| Timer | A stopwatch on the video that counts from the frame where you place it. See "Time a movement" below. |
| Text | Types a note on the video. See [Add text to a video](/coaching/analyze/how-to-use-the-text-annotation-tool.md). |
## Choose your five tools
The toolbar holds five tools at a time, and you can put any tool in any slot. Onform remembers your choices.
1. Tap the slot you want to change, so it's selected.
2. Tap it again. The full tool panel opens, with every tool, five line thicknesses and five colors.
3. Tap a tool, a thickness or a color. The slot changes to match.
For example, keep line, angle, circle and arrow in four slots for everyday coaching, and swap the fifth between text and the timer.
## Change colors and thickness
* **Thickness:** in the tool panel, tap one of the five line thicknesses. For the text tool, this sets the size of the text.
* **Color:** tap one of the five colors.
* **Make your own color:** double-tap a color in the tool panel and pick a new one. It replaces that color in your panel, and Onform remembers it.
Bright colors such as yellow or white show up best on a dark background, like an indoor court or a night game.
## Move, change or delete a drawing
* **Move it:** tap the drawing to select it, then drag it.
* **Reshape it:** tap it, then drag the dots at its ends.
* **Delete it:** tap it, then tap the trash button.
* **Undo** removes your last drawing. **Clear** removes them all.
## How drawings work with playback
Drawings aren't tied to a frame. They stay in the same place on screen while the video plays, so they don't follow the athlete. Draw on a paused frame to mark one moment, or draw a reference line (a spine angle, a target line) and play the video to see the athlete move against it.
To show different drawings at different moments, record a [Voice-over](/coaching/analyze/how-to-record-a-voiceover.md): pause, draw, talk, then tap **Clear** and move on to the next moment. Your drawings, your voice and the video all go into the recording.
On iPhone and iPad, Onform keeps your drawings on the video, so they're there when you open it again. If you'd rather start with a clean video each time, open Onform's **Settings**, go to **Video Player** and turn on **Disable Saving Of Drawings**.
## Send your drawings to an athlete
To send your markup to an athlete, record a Voice-over. It saves the video, your drawings and your voice as a new video you can share. See [Record a Voice-over](/coaching/analyze/how-to-record-a-voiceover.md).
## Measure a distance (iPhone and iPad)
The distance tool shows lengths in real-world units once you tell it the scale.
1. Choose the distance tool and draw a line along something in the video you know the length of, such as a 1-meter alignment stick, home plate or a hurdle.
2. Tap the measurement on the line.
3. Enter its real length and choose a unit (millimeters, centimeters, meters, inches, feet or yards), then tap **Done**.
4. Draw more distance lines. They now show real lengths, such as stride length or stance width.
For an accurate reading, the reference and the thing you measure need to be the same distance from the camera.
## Time a movement (iPhone and iPad)
1. Move the video to the frame where the movement starts, such as the foot leaving the ground.
2. Choose the timer and tap the video where you want the stopwatch. It counts from this frame as the video plays.
3. To stop it, move to the frame where the movement ends and tap the timer. It now shows the time between the two frames.
4. To start again, tap the timer on a new frame.
The timer works on videos only, not on photos or the 3D view.
## If something goes wrong
| What you see | What to do |
| ---------------------------------------------------------------------------------------------------------- | -------------------------------------------------------------------------------------------------------------------------- |
| A tool you used to have is missing from the toolbar | Tap the slot you want, tap it again, then pick the tool in the panel. It stays in that slot. |
| "Angle Tool is not available in 3D" or "Timer Tool is not available in 3D" | Switch back to the video view to use these tools. |
| "Timer Tool is not available for images" | The timer needs a video, so it doesn't work on photos. |
| Your drawings don't shrink with the videos when you record a Voice-over over a comparison (iPhone or iPad) | Open Onform's **Settings**, go to **Video Player** and turn on **Disable HD Aspect Ratio Voice-overs**, then record again. |
| Some buttons at the top are missing (iPhone or iPad) | Look in the **⋯** menu at the top right. Bold or larger text in your device settings can move buttons there. |
| You can't find the angle or text tool on the web | The web app has free draw, line, box and circle only. Use an iPhone or iPad for the full set. |
| Your athlete can't see your drawings | Record a Voice-over with your drawings and send that. |
Still stuck? Email with your device, the Onform version and a screenshot.
## Related
* [Measure an angle](/coaching/analyze/using-the-angle-tool.md)
* [Add text to a video](/coaching/analyze/how-to-use-the-text-annotation-tool.md)
* [Record a Voice-over](/coaching/analyze/how-to-record-a-voiceover.md)
* [Compare two videos](/coaching/analyze/how-to-compare-videos.md)
* [Draw on the camera before you record](/coaching/record-and-import/live-drawing-helps-analyze-setup-form-before-recording.md)
* [Analysis tools at a glance](https://github.com/Onform-Inc/onform-docs/tree/main/get-started/how-onform-works/analysis-tools.md)
---
# Agent Instructions
This documentation is published with GitBook. GitBook is the documentation platform designed so that both humans and AI agents can read, navigate, and reason over technical content effectively. Learn more at gitbook.com.
## Querying This Documentation
If you need additional information that is not directly available in this page, you can query the documentation by asking a question.
Perform an HTTP GET request on the following URL with the `ask` and `goal` query parameters:
```
GET https://help.onform.com/coaching/analyze/finding-and-using-the-drawing-toolbox.md?ask=&goal=
```
`ask` is the immediate question: it should be specific, self-contained, and written in natural language.
`goal` is what the user is ultimately trying to achieve, the reason they need the answer. Sharing it helps GitBook give you a better, more relevant answer. A goal is most helpful when it describes the outcome the user wants rather than restating the question. For example, with `ask=how do I create an API token`, a goal like `automate deployments from our CI pipeline` lets GitBook tailor the answer to that use case.
The response will contain a direct answer to the question and relevant excerpts and sources from the documentation.
Use this mechanism when the answer is not explicitly present in the current page, you need clarification or additional context, or you want to retrieve related documentation sections.